[lwptoc]
-
前言
Apacge Cordova 是一款開源的框架,讓人們可以使用 web (HTML/CSS/JavaScript) 語言開發 App,以 Web view形式提供 UI 介面,但若要調用到手機裝置的功能,則必須透過 plugin 去取得所需的資源, Cordova 官方提供多個 plugin 供開發者調用,如 Camera、file …等。下圖為 cordova 框架之示意圖:
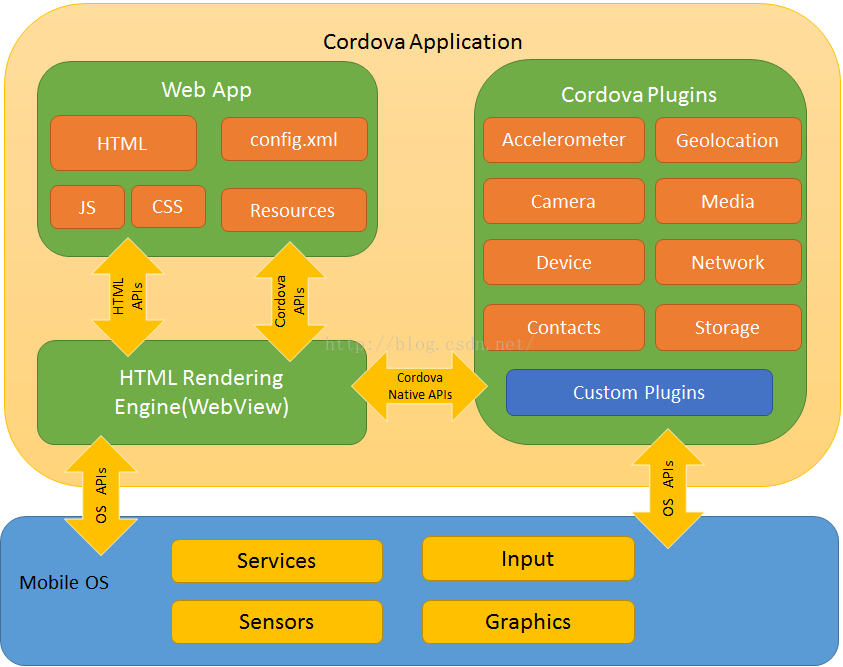
(圖片出處:https://blog.csdn.net/xinruzhishui_11/article/details/77185896)
但即便透過 plugin 可以解決基本功能的需求,但也有很多開發者無法由公開的 plugin 獲得想要的手機內資訊,如今天所要討論的:本機之 uid 識別碼(以 iOS 平台為例)。以下介紹藉由自己建立套件來獲取本機之 uid 識別碼。
-
建立套件
一般來說,第三方套件都會有一個管理庫,如同 Swift 的套件由 CocoaPods 管理, cordova專案也有負責的管理庫,稱作 plugman。本文範例為以 swift 撰寫 cordova plugin 獲得手機 uid 碼,故取名為 FetchDevice,安裝方式為由終端機下以下的指令:
1.安裝 plugman
$ npm install -g plugman
2.創建你自己的 plugin
$ plugman create –name FetchDevice –plugin_id cordova-plugin-fetch-device-test –plugin_version 0.0.1 –path FetchDeviceTest
說明一下上方的指令:
name 後方輸入自己的套件名稱,而 plugin_id 則是為自己的套件取一個唯一的識別碼,特別注意若日後套件要上傳到公開平台,則 id 不可與其他已有的公開 id 重複,可使用 plugman search <plugin keywords> 搜尋是否重複,非本篇重點故並不加以深入討論。version 後方輸入自訂的版本號,以方便自我管理,而 path 後方放路徑,也就是此 plugin 會放置於的資料夾。
經過此步驟後,所建立之套件會放置於 FetchDeviceTest/FetchDevice ,並自動建立一個 plugin.xml檔案如下:
<?xml version=’1.0′ encoding=’utf-8′?>
<plugin id=”cordova-plugin-fetch-Device-test” version=”0.0.1″ xmlns=”http://apache.org/cordova/ns/plugins/1.0″ xmlns:android=”http://schemas.android.com/apk/res/android”> <name>FetchDevice </name> <js-module name=”FetchDevice” src=”www/FetchDevice.js”> <clobbers target=”cordova.plugins.FetchDevice” /> </js-module></plugin>
特別注意的是,clobbers target 是日後呼叫此套件時會用到的前綴,例如要使用到 plugin 內的 test() function,則呼叫方式為 cordova.plugins.FetchDevice.test()。而此部分可以自己隨意命名。
接下來編輯此xml檔,讓日後創建的 swift 資料夾可以被正確訪問到,新增 platform tag 如下,並至於 plugin tag內:
<?xml version=’1.0′ encoding=’utf-8′?>
<plugin id=”cordova-plugin-fetch-Device-test” version=”0.0.1″ xmlns=”http://apache.org/cordova/ns/plugins/1.0″ xmlns:android=”http://schemas.android.com/apk/res/android”> <name>FetchDevice </name> <js-module name=”FetchDevice” src=”www/FetchDevice.js”> <clobbers target=”cordova.plugins.FetchDevice” /> </js-module>
<platform name=”ios”> <config-file target=”config.xml” parent=”/*”> <feature name=”FetchDevice”> <param name=”ios-package” value=”FetchDevice” /> </feature> </config-file> <source-file src=”src/ios/FetchDevice.swift” /></platform>
</plugin>
可由上方xml檔案看到 js-module 被創立了一個 js 檔案 FetchDevice.js,接下來就可以於此 js 檔案內編輯 javascript 與 swift 溝通的接口。
-
建立接口
進入自動建立的 js 文件內,可看到下方程式碼:
var exec = require(‘cordova/exec’);
exports.coolMethod = function(arg0, success, error) {
exec(success, error, “FetchDevice”, “coolMethod”, [arg0]);
};
在解釋程式碼之前,我們先將 www/FetchDevice.js 檔案內方程式命名改為我們想要的:
exports.fetchDeviceID= function(arg0, success, error) {
exec(success, error, “FetchDevice”, “fetchDeviceID”, [arg0]);
};
-
撰寫原生程式碼
創立一個swift 文件並放置於 src/ios 內且命名為 FetchDevice.swift,鍵入以下程式碼:
@objc(FetchDevice) class FetchDevice : CDVPlugin {
func fetchDeviceID(_ command: CDVInvokedUrlCommand) {
var pluginResult = CDVPluginResult(
status: CDVCommandStatus_ERROR
)
let id = (command.arguments[0] as! NSObject).value(forKey: “id”) as? String ?? “”
Var deviceID: String?
if id == “uid” {
deviceID = UIDevice.current.identifierForVendor!.uuidString;
pluginResult = CDVPluginResult(
status: CDVCommandStatus_OK,
messageAs: deviceID
);
self.commandDelegate!.send(
pluginResult,
callbackId: command.callbackId
);
}
}
}
js端程式解說如下:
exports.js的程式名稱= function(js傳給swift的參數, swift回傳success(資料), swift傳回err(錯誤訊息)) {
// 實作
exec(success, error, “swift的 class”, “swift 的方程式名稱”, [js傳給swift的參數]);
};
swift端程式解說如下:
@objc(FetchDevice) class FetchDevice : CDVPlugin {
func fetchDeviceID(_ command: CDVInvokedUrlCommand) {
// 先假設回傳狀態為Error
var pluginResult = CDVPluginResult(
status: CDVCommandStatus_ERROR
)
// 特別注意由js端傳至swift的參數是以 array 形式包起來
let id = (command.arguments[0] as! NSObject).value(forKey: “id”) as? String ?? “”
Var deviceID: String?
// 若js傳進來的參數為 “uid” 則呼叫callback function
if id == “uid” {
deviceID = UIDevice.current.identifierForVendor!.uuidString;
pluginResult = CDVPluginResult(
status: CDVCommandStatus_OK,
messageAs: deviceID
);
self.commandDelegate!.send(
pluginResult,
callbackId: command.callbackId
);
}
}
}
-
創立json 檔
為了讓套件可以被正確訪問, cordova 套件皆必須含有 package.json 檔案,此時以 plugman 生成此 JSON 檔案,於終端機鍵入
$ plugman createpackagejson ../FetchDeviceTest/FetchDevice
-
安裝套件
在專案中安裝此測試套件之前,我們必須先安裝cordova-plugin-add-swift-support 套件,由於 cordova 在應用程式內仍是使用 object-C 語言編譯,因此要在此 plugin 注入 cordova library 時必須要透過 header檔案。此 plugin 會於 cordova 專案中自動生成 header 檔案連結 object-C 與 swift 。於終端機輸入
1.於專案下安裝 swift-support plugin
$ cordova plugin add cordova-plugin-add-swift-support
2.於專案下安裝本套件
$ cordova plugin add ../FetchDeviceTest/FetchDevice
附註: header 為一個 .h 檔,裏頭有一行程式碼 #import <Cordova/CDV.h>,此時就會在我們的專案中為有 swift 檔案注入 Cordova lib.
-
呼叫套件
安裝完成後,鍵入以下程式碼,就可藉由套件呼叫而得到本機的 uid碼了!
Cordova.plugins.FetchDevice.fetchDeviceID(
{“id”:”uid”},
function(success){
// your code
}, function(error) {
// your code
});
-
結語
即便 cordova 能夠讓前端工程師們以 javascript 輕鬆撰寫 web-App,但若是要獲取手機提供的功能或 API ,則還是需要仰賴套件。自己寫套件不是一件容易的事,但也可以因此而獲得撰寫原生語言的能力!還有要注意的是,本篇範例只以 ios 為例,有興趣的人也可以研究 android 端的語言如何撰寫,以獲得雙平台的能力。